JAMStack with Hugo and NetlifyCMS - Part 1
Introduction
In this post, I will introduce concept of JAMStack and how to build up a simple website on localhost with hugo and NetlifyCMS. But at first, we will quickly go through a few definitions.
This is the github repository for this site: https://github.com/tranvnb/hugo-and-netlifycms
What is JAMStack and Why JAMStack
JAM acronym stand for Javascript, API, and Markdown which in a combination will create a SEO friendly web content. Moreover, because most of the pages are static content, it’s easy to apply any kind of cache mechanism. Outside of that, there’s a lot of advantages (and yes disadvantages) which will be covered in another post.
What is Hugo
Hugo is a static site generator framework written in GO language. This is the definition from Hugo website:
In technical terms, Hugo takes a source directory of files and templates and uses these as input to create a complete website.
What is NetlifyCMS
Netlify CMS is a static site content management, utilizes the Git workflow to manage site content. Basically, it provides editors a UI tool for administrating articles and then updating to local git repositories.
NetlifyCMS is different from Netlify, it is a CMS while Netlify is a online platform to deploy, serve, and maintain your front end site and web apps.
Create a new Hugo site
There are various ways to install Hugo described on Hugo website, I will skip this part and go directly to creating a new website.
Create new site
  $ hugo new site my-site
  $ cd my-site
You will get a new folder as below
  .
  ├── archetypes
  │   └── default.md
  ├── config.toml
  ├── content
  ├── data
  ├── layouts
  ├── static
  └── themes
Create a new content
The
default.mdis the default template of a new post/content. Let create a new articles and see how it works.$ hugo new posts/my-first-post.md $ cat content/posts/my-first-post.md --- title: "My First Post" date: 2021-02-22T13:18:04-08:00 draft: true --- This is my first post using Hugo generatorAdd a text below the 3 dash as above.
Start server
$ hugo serve -DThe
-Dparameter is to generate including draft file which hasdraft: trueon its content headerOpen browser at
localhost:1313. At this time, you wont see anything shows up because we didn’t create a default layout for the website.Create default layout for the website
$ touch layouts/index.htmladd the content to index.html file:
<body> <h1>This is posts section</h1> <ul> <!-- we iterate all posts in "posts" section --> {{ range (where .Pages "Section" "posts") }} <li> <a href="{{ .RelPermalink }}"> {{ .Title }} </a> </li> {{ end }} </ul> <h1>This is blogs section</h1> <ul> <!-- we iterate all posts in "blogs" section --> {{ range (where .Pages "Section" "blogs") }} <li> <a href="{{ .RelPermalink }}"> {{ .Title }} </a> </li> {{ end }} </ul> </body>.RelPermalinkis a permanent link to pages. Refer Page Variables on Hugo page.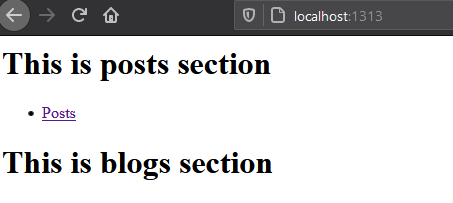
Now you can see the home page show a link to all posts but when click on the link, there's nothing. This because we haven't create a layout to show all of posts yet. Let create a list layout for posts.Create a layout for all post posts
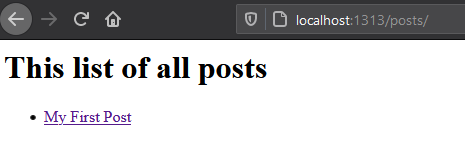
$ touch layouts/posts/list.htmlAdd the content:
  <body>
    <h1>This list of all posts</h1>
    <ul>
    {{ range .Pages }}
    <li>
        <a href="{{ .Permalink }}">
        {{ .Title }}
        </a>
    </li>
    {{ end }}
    </ul>
  </body>
Now when click on the Posts link on the home page, we will get a list of posts we have just created.
But still we can’t see the content of posts because we haven’t create the layout of it yet.
Create a layout for a single posts.
$ touch layouts/posts/single.htmlAdd the content:
  <!DOCTYPE html>
  <html lang="en">
  <head>
      <meta charset="UTF-8" />
      <meta name="viewport" content="width=device-width, initial-scale=1.0" />
      <meta http-equiv="X-UA-Compatible" content="ie=edge" />
      <title>{{ .Title }}</title>
  </head>
  <body>
      <h1>{{ .Title }}</h1>
      <p class="date">{{ .Date }}</p>
      <article class="content">
      {{ .Content }}
      </article>
  </body>
  </html>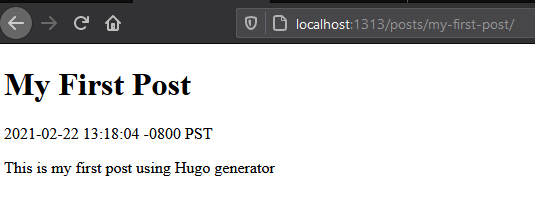
Create the same files and folders for blogs as folder structure below:
  .
  ├── archetypes
  │   └── default.md
  ├── config.toml
  ├── content
  │   ├── blogs
  │   │   └── my-first-blogs.md
  │   └── posts
  │       └── my-first-post.md
  ├── data
  ├── hugo.exe
  ├── layouts
  │   ├── blogs
  │   │   ├── list.html
  │   │   └── single.html
  │   ├── index.html
  │   └── posts
  │       ├── list.html
  │       └── single.html
  ├── resources
  │   └── _gen
  │       ├── assets
  │       └── images
  ├── static
  └── themes
Summary
Now you have a very basic site with Hugo In In Part 2, I will introduce how to integrate Hugo with NetlifyCMS, and configuration to work with it locally.